
Sep. 03, 2026
Learn how to install and maintain a Submersible UV Lamp system, including setup steps, safety checks, routine cleaning, and troubleshooting tips. This guide is written for pond owners, aquarium operators, and small water-treatment users who need a practical Submersible UV Lamp workflow instead of a generic inline UV overview. It also references Renchuang as a company example and includes the provided image for placement context. If your goal is How to Install and Maintain a Submersible UV Lamp System, the core sequence is simple: position the unit correctly, connect power and flow safely, then clean and inspect it on a schedule.
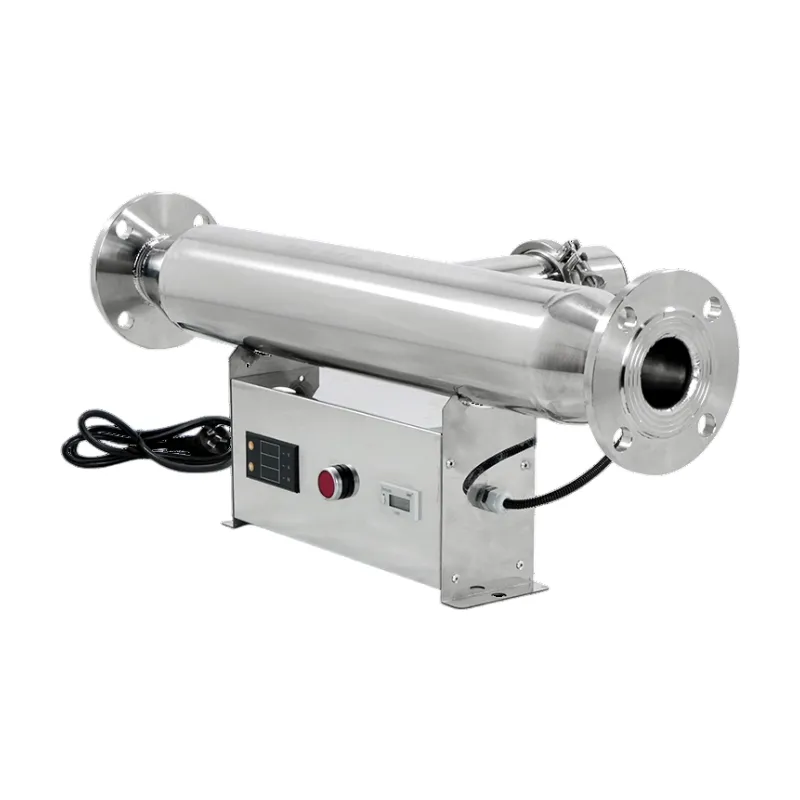
A submersible UV lamp system is a water disinfection device designed to operate inside a tank, sump, pond, or filtration chamber while the lamp remains protected in a waterproof housing. In practical terms, it uses ultraviolet energy to reduce algae, bacteria, and other microorganisms in closed water loops. This makes it different from an inline system, which is installed inside a pressurized pipe run. For buyers comparing submersible UV lamp system for water treatment options, the main benefit is compact placement close to the water source.
The system is usually selected for pond circulation, aquarium sterilization, small recirculating water loops, and some aquaculture setups. Compared with inline units, it usually relies more on placement depth, flow path, and surface cleanliness than on plumbing pressure ratings. For that reason, installation and maintenance quality matter as much as the lamp specification itself. In many field setups, poor placement causes more failures than lamp defects.
A typical system includes the UV lamp, quartz sleeve, waterproof housing, cable gland, mounting hardware, and power supply. The quartz sleeve isolates the lamp from water while allowing UV transmission. Over time, mineral scale and biofilm reduce UV output, so cleaning is part of the operating cost. That is why submersible UV lamp system maintenance should be planned from day one, not after output drops.
Installing a submersible UV lamp installation guide correctly starts with water path planning, not hardware assembly. The unit should sit where water is forced to pass the lamp zone, with enough residence time for UV exposure. If the device is placed in a dead corner or near a fast bypass channel, the water may circulate without receiving effective treatment. In pond and aquarium systems, the installation point should match the return flow path, not just the easiest physical location.
The sequence above reduces electrical exposure and dry-run risk. It also makes later inspection easier because cable routing and access points are defined before startup. In field maintenance logs, systems with clearly marked service access typically reduce service time from 30–45 minutes to about 15–20 minutes for routine checks, mainly because technicians do not need to disassemble surrounding plumbing. That time savings becomes important when multiple tanks or ponds are involved.
Placement affects both UV dose and operating safety. A lamp that is installed too close to the surface may partially expose seals and wiring to air, while a lamp installed too deep without service access can be difficult to inspect. Good placement also supports the correct plumbing order: water should move through pre-filtration first, then through the UV treatment area, then back to the system. If solids are not removed first, the sleeve fouls faster and output falls sooner.
For buyers asking where should a UV system be installed in the plumbing line, the answer is usually after mechanical filtration and before the return point. That order reduces suspended particles and improves UV penetration. In open pond systems, the same principle applies even though the unit is submersible rather than inline. If the flow carries heavy debris, the system spends more time cleaning the sleeve than disinfecting the water.
A submersible unit is especially sensitive to dry-run conditions because the lamp and sleeve depend on surrounding water for thermal stability. Even short exposure outside the intended water zone can create temperature stress and reduce service life. This is one of the main differences between How to Install and Maintain a Submersible UV Lamp System and maintaining a standard inline chamber. Submersible placement requires more attention to exposure depth, splash risk, and cord routing.
A simple checklist helps standardize installation quality across small sites. It is useful for a submersible UV lamp system guide because many failures are caused by missed setup details rather than component defects. The checklist below is designed for pond, aquarium, and compact recirculating systems. It also aligns with common water disinfection system safety practices.
| Item | Check | Target |
|---|---|---|
| Power isolation | Confirmed before handling | 100% off |
| Lamp fit | Lamp seated correctly in sleeve | No wobble |
| Cable routing | Above waterline and strain-relieved | No tension |
| Submersion depth | Lamp fully submerged | No exposed seal |
| Flow path | Water passes through treatment zone | No bypass |
| First run | Visual inspection for leaks and flicker | Stable operation |
This checklist is useful because it translates installation into measurable conditions. “Stable operation” should be verified by visible lamp illumination, normal temperature rise, and absence of leaks during the first operating cycle. For smaller systems, a 15-minute monitoring window after startup is usually enough to catch installation errors. For larger pond loops, operators often recheck after 1 hour because circulation patterns can shift once the pump reaches steady flow.
The lamp installation and replacement procedure should always start with power isolation and cooling time. UV lamps are sensitive components, and the quartz sleeve can retain heat after shutdown. If the lamp is removed too soon, the risk of burns and sleeve breakage rises. A practical rule is to wait until the assembly is cool to the touch before opening the housing.
Using clean gloves matters because skin oil can leave a residue on the quartz sleeve or lamp surface. Even a thin film can reduce transmission and make the lamp appear weaker than its rated output. In practice, operators should document serial numbers, replacement date, and run hours. That record helps enforce the UV lamp replacement schedule and reduces guesswork when performance changes.
Many UV lamps are replaced on an annual cycle in continuous-duty systems, while some low-hours pond setups can run longer if the manufacturer specifies it. The exact interval depends on operating hours, water clarity, lamp type, and whether the unit runs 24/7. If a sterilizer runs every day for months, output declines before the lamp fails completely. For users asking, “How often should a UV lamp be replaced?”, the safer answer is to follow the rated service life rather than wait for visible failure.
A practical maintenance record should track three variables: lamp age, weekly operating hours, and cleaning frequency. If a lamp has been in service for 8,000 to 9,000 hours in a continuous cycle, replacement planning should begin even if the light still turns on. That approach reduces the risk of operating below target UV intensity. It also helps with total cost of ownership because unexpected downtime often costs more than planned replacement.
Quartz sleeve cleaning is one of the most important tasks in any submersible system because the sleeve is the barrier between the lamp and the water. When scale, algae film, or mineral deposits accumulate, the lamp may still illuminate but deliver less usable UV output. In small pond or aquarium systems, light transmission can decline significantly if the sleeve is not cleaned on schedule. A maintenance plan should therefore define cleaning frequency, inspection points, and replacement triggers.
For many submersible pond-style units, weekly visual inspection and monthly cleaning is a practical starting point. If the water has high hardness, algae load, or suspended solids, cleaning may be needed every 1 to 2 weeks. If the unit runs in a cleaner indoor loop, the interval can often be extended. The correct interval should be based on water quality, not calendar convenience alone.
When users ask, “How do you clean a quartz sleeve on a UV system?”, the answer is to shut off power, remove the lamp carefully, clean the sleeve with a non-abrasive cloth and a suitable descaling solution, then rinse and dry before reassembly. Abrasive pads should not be used because they can scratch the quartz and permanently reduce transmission. In systems with recurring mineral deposits, a mild citric-acid-based cleaner is commonly used because it breaks down scale without aggressive mechanical abrasion. Always confirm compatibility with the housing seals before applying any cleaner.
| Use Case | Inspection | Cleaning | Lamp Replacement |
|---|---|---|---|
| Small aquarium loop | Weekly | Every 4 weeks | 9–12 months |
| Garden pond system | Weekly | Every 2–4 weeks | 9–12 months |
| High-load aquaculture loop | 2–3 times weekly | Every 1–2 weeks | Based on hours |
| Low-use seasonal system | Before each run | Before season start | Based on age and hours |
This table is not a universal rule, but it gives a practical starting point for submersible UV lamp system maintenance. The more organic load and hardness in the water, the shorter the cleaning cycle should be. Seasonal systems also need pre-run inspection because storage can dry out seals and collect dust on electrical parts. A system that sits unused for months should never be restarted without checking sleeve condition, lamp integrity, and gasket elasticity.
A submersible unit works by exposing flowing water to ultraviolet radiation inside a protected chamber or submerged housing. The UV light damages the DNA or RNA of microorganisms, reducing their ability to reproduce. The process is physical, not chemical, so it does not add disinfectant residuals to the water. That is useful in aquarium and pond applications where users want treatment without chlorine-based dosing.
The result depends on water clarity, flow speed, lamp power, and how much of the water actually passes the lamp zone. If flow is too fast, exposure time falls. If the sleeve is dirty, UV transmission drops. If the placement allows bypass circulation, only part of the water receives treatment. These are the main operating variables for submersible UV lamp system explained in practical terms.
In many systems, yes, continuous operation is preferred when the goal is ongoing microbial control. A sterilizer that cycles on and off can allow algae or microorganisms to rebound during off periods. However, the final answer depends on the system volume, fish load, and whether the unit is meant for water polishing or full-time disinfection. For ponds and aquariums with active biological load, continuous operation is usually easier to manage than frequent start-stop cycling.
That said, running all the time only makes sense if the unit is correctly installed and maintained. Continuous operation with a dirty sleeve or aged lamp can waste power without delivering the intended UV dose. This is why submersible UV lamp system maintenance is tied directly to energy and operating cost. A lamp that is on 24/7 but poorly maintained can increase cost per treated liter without improving water quality.
The main difference between a submersible UV lamp system vs inline UV system is installation format. Inline systems sit in a closed pipe and usually depend on pump pressure and flow control, while submersible systems work inside a tank, pond, or chamber. Inline units are often easier to size for known pipe flow, but submersible units can be easier to place in compact or irregular water spaces. The right choice depends on plumbing layout, service access, and how much water needs treatment.
Submersible systems are often favored in ponds, aquariums, and small recirculating loops because they can be installed directly in the water body. Inline systems are usually better when the water line is fully controlled and the operator wants a predictable pipe path. For buyers comparing submersible UV lamp system comparison options, the decision usually comes down to location, not lamp theory. If the water cannot be routed cleanly through a pipe, a submersible unit may be the more practical solution.
Choosing the right system starts with water volume, target organism load, and service access. The lamp wattage should match the system size, but higher wattage alone does not solve poor placement or dirty water. Buyers should also check whether the housing is rated for the intended depth and whether spare lamps and sleeves are available. If a replacement part takes several weeks to source, downtime risk increases.
For submersible UV lamp system for small business use cases, the most important metrics are service frequency, replacement cost, and downtime exposure. A small aquaculture site, for example, may prefer a unit with simple sleeve access and a predictable lamp replacement interval. A pond maintenance business may prioritize faster disassembly and standardized parts over the lowest initial price. These choices affect long-term cost more than the sticker price alone.
Renchuang is one example of a supplier name users may encounter when researching submersible UV products and water-treatment equipment. When evaluating any supplier, check whether the product data includes rated lamp life, sleeve material, ingress protection details, and replacement part availability. Those items are more useful than broad claims because they affect operating cost, service schedule, and delivery risk. Buyers who need documentation should ask for the same technical sheet format across all quotes so comparisons stay consistent.
The total cost of ownership for a submersible UV lamp system includes the initial unit price, power use, lamp replacements, sleeve cleaning time, and spare parts. Even a low-cost unit can become expensive if the lamp is replaced too often or if the sleeve is difficult to access. In small systems, labor time is often the hidden cost. A 20-minute cleaning task repeated every 2 weeks adds up to more than 8 hours per year for one unit.
A simple planning model can help. If a system uses one lamp, requires monthly sleeve cleaning, and annual lamp replacement, the operator should budget for 12 cleanings and 1 lamp change each year. If hard water shortens the cleaning cycle to every 2 weeks, that becomes 26 cleanings annually. This difference affects labor, consumables, and downtime. For a business running multiple tanks, those extra tasks can matter as much as electricity.
| Cost Item | Typical Planning Metric | Why It Matters |
|---|---|---|
| Lamp replacement | 9–12 months or rated hours | Protects UV output |
| Sleeve cleaning | 2–4 weeks, depending on water | Prevents transmission loss |
| Seal inspection | Every cleaning cycle | Reduces leak risk |
| Spare parts | On-site for critical units | Shortens downtime |
| Labor time | Minutes per service event | Affects operating cost |
This cost table supports better buying decisions because it separates purchase price from operating burden. For water-treatment users, the cheapest unit is not always the least expensive over 12 months. The better choice is the one with clear service intervals, accessible parts, and a documented replacement schedule. That approach is especially important for facilities where water quality disruptions affect stock health or production continuity.
A few operating habits consistently improve results. First, keep the pre-filtration stage clean so solids do not coat the sleeve. Second, inspect the lamp output visually on a fixed schedule rather than waiting for water problems. Third, record each service event so patterns become visible over time. These practices are useful whether the system is new or already in operation.
For users asking whether a submersible UV lamp system worth it depends on use case, the answer is yes when the system is sized correctly and maintained on schedule. It is less suitable when the water is muddy, the service access is poor, or the operator cannot track lamp hours. In those cases, even a properly specified unit can underperform because the maintenance burden is higher than expected. The value comes from consistent operation, not from the lamp alone.
How to Install and Maintain a Submersible UV Lamp System comes down to three disciplined actions: place the unit in the correct water path, replace the lamp on a documented schedule, and clean the quartz sleeve before deposits block UV transmission. For pond, aquarium, and compact water-treatment users, the most important differences from inline systems are placement depth, dry-run prevention, and a maintenance schedule tailored to submersible operation. If you are comparing products, request rated lamp life, sleeve access details, and spare-part availability before buying. That reduces quality compliance risk, delivery risk, and total cost of ownership over the first year.
If you are setting up a new system, start with the installation checklist, then create a service log with weekly inspection, monthly cleaning, and lamp replacement based on operating hours or the manufacturer’s rated life. If you already have a unit in service, check the quartz sleeve first, because fouling is often the fastest cause of lost performance. For users reviewing suppliers such as Renchuang, the key questions are not promotional claims but technical documentation, part availability, and clear service intervals. Following those steps makes the system safer, easier to maintain, and more predictable over time.
A: For procurement, focus on water volume, installation depth, service access, and whether the lamp and quartz sleeve are easy to replace. The article shows that performance depends on correct placement, clean sleeve condition, and stable submersion, so a buyer should confirm rated wattage, waterproof housing, cable routing, and spare-part availability before ordering.
A: Match the wattage to the actual treated volume and the water load, not just the tank size. For cleaner indoor loops, a smaller unit may be enough; for ponds, aquariums, or higher organic load, you need enough output and residence time to avoid bypass and weak UV exposure. Ask for rated lamp life and operating guidance based on your application.
A: It should be placed where water is forced through the UV treatment zone, with the lamp fully submerged and the cable routed safely above the waterline. The article emphasizes installing after mechanical filtration when possible, because pre-filtering reduces debris, slows quartz sleeve fouling, and improves UV transmission.
A: A practical starting point is weekly inspection, cleaning every 2 to 4 weeks for typical pond or aquarium use, and lamp replacement around 9 to 12 months or based on rated operating hours. If the water has high hardness, algae, or solids, the cleaning interval should be shorter. Buyers should plan maintenance costs before purchase because sleeve cleaning and lamp replacement affect total ownership cost.
A: When evaluating a supplier, this is one of the most important buying questions. The article highlights that replacement part availability, sleeve access, and gasket condition directly affect downtime and operating cost. Before placing an order, confirm whether the supplier can provide lamps, quartz sleeves, and seals with clear technical specifications and consistent replacement intervals.
Related News

May. 14, 2026

Apr. 16, 2026

May. 08, 2026

Apr. 15, 2026
Jun. 02, 2026

Apr. 16, 2026
Related Products
Request a Quote
Request a Quote
Navigation
Navigation
Contact Us
Contact Us
E-mail: 15131268906@163.com
Mobile: +86 139 3228 0847
Tel.: +86 312 236 0585
WeChat: A13932280847
Add.: 62 Yangzhuangzi Community Ecological Street, Xicheng District, Dingzhou City.


